Thursday, December 6, 2012

It's that time of year!

I want to start off this post by saying

!!!I LOVE CHRISTMAS!!! 

Seriously!!! I love looking at everyone's christmas decorations, the cooler weather, the food and presents of course! Love it!!! I don't decorate for other holidays just christmas. Now I've never really been able to seriously decorate for christmas because we could just never afford to go get a tree or buy a ton of ornaments or any other little christmas vignettes around our house -- mostly because I hadn't found my true crafty mojo yet. I know you can make a beautiful christmas for cheap but I just didn't understand how to do it.  But this year we finally bought a tree! So exciting!!! We got it from hobby lobby and it's beautiful!!!

Here's my little man showing it off!

If you didn't notice there are two lonely ornaments on it in the picture. I had those laying around because I made them! Go me!!! I was inspired by Pinterest -- yea I know who isn't? -- and decided to make some of my own. If you like rustic textured ornaments then you'll like the one I'm going to show you today!

                                 DIY Jute Christmas Ornament                                     

Supplies: 
Styrofoam ball
Jute String 
Glue Gun
Glue Sticks
Scissors

 The first thing you do is cut 6 1/2 in. of jute and set aside -- this will be for the loop to hang from the tree. Next take your jute and glue the end to your styrofoam ball.


Then add a dab of glue and fold the jute on itself to start wrapping it around the ball. Then you add strands of glue as you wrap the jute around. 


It was kinda therapeutic wrapping the jute around and I forgot to take pictures of most of the progress but you get the idea -- you wrap and wrap. 


*As you can see in the picture I glued the loop on the ball. Now I had originally glued the loop on first but when I started wrapping the jute around the ball I realized it wasn't center so I ripped it off and re-glued it. It's totally up to you but I think it's easier to wrap the ball first and when you get to the top (the section in the pic above) I would add your loop. 

Once you've gotten closer to top take the 6 1/2 in. of jute you set aside earlier and glue it centered on the very top of the ball. Then guess what... you continue wrapping your ball. As you get closer to the loop hold the loop up and continue wrapping to make sure your loop will be centered and hang straight.  When you've covered everything up to the loop cut the jute, finish wrapping and glue in place.


Ta-Daa!!!
You have a beautiful rustic ornament!


Hope you like it, I know I do!!! Now I need to get to work on my other DIY ornament! 

LoveYA


Wednesday, November 21, 2012

Vampires, Werewolves and Young House Love!!!

Last weekend we had an adult weekend! I had everything planned to the T and thanks to my mommy and daddy who took our little guys for weekend everything went perfectly!!!

Friday the hubs and I drove half way to Abilene to to meet my dad to hand over the kiddos. We then high tailed it back to Arlington to have our dinner date. We went to our normal spot BJs -- SO GOOD! After dinner we had a little time to relax ( I don't know how you are but I HATE waiting so not so much relaxing for me). Then we picked up my friend Krimson and our sister in law Maura to go see Breaking Dawn 2.


Yes I am a Twi-Hard.... I guess... I honestly don't even know if that's how you spell it. I've read the books and have seen all of the movies. I don't have posters or anything. But anyway the movie was AMAZING!!! The "twist" definitely almost gave me a heart attack. Me and Maura kept looking at each other in shock. I was so happy it ended exactly the way it did in the book. Such a good movie! I want to go see it again! Yes I'm one of those... 


We got home movie around 1am after dropping everyone off and probably went to sleep around 1:30am. I wanted to wake up early the next morning because we were going to go meet Sherry and John Petersik from young house love! I can not begin to tell you how excited I was! I wanted to get there extra early because I knew there would be a line but because we were up so late the night before it didn't happen. We ended up getting there around 10am after a pit stop at Chik Fil A for the hubby. He didn't understand that I wasn't the only person in the dfw area that read their blog. When we got there he was like "the lines not that bad" and after a couple of minutes he realized it went around the building. Yea... It wasn't a big deal though we actually met some sweet ladies in line from Louisiana. We had a lot of fun waiting and talking and chowing down on some young house love inspired cookies and yummy cocoa. 


I started to get a little stalkerish and crazy when I saw John inside. And of course I have some stalkerish pics for you.

 John Petersik
Sherry and John Petersik with a random person
In case you didn't know "stalkerish pics" = blurry/horrible pics...

As we got closer I started to get nervous about what I'd say. Seriously?!?! Yes... don't ask me why. It took awhile to go through the whole line. Once we were inside people started sitting on the furniture including my hubby who sat down at a table and took a cat nap. hehe...


Finally it was our turn!!! I had my book and camera ready. I thought it was funny that Sherry kept saying "Come on down!" to the next person in line. When I walked up I couldn't stop smiling -- even Sherry said I was all smiles. All I thought was yea I'm meeting yall!!!  She asked if I was Holly which I told her yes. She said it was a very beautiful name and that they almost had a Holly (meaning their adorable daughter Clara) and then Sherry said but John had an ex named Holly so that couldn't happen... Hmmm... So does she really like the name? Was it a situation where she was pregnant thinking about names and was like I like Holly and John was like Yea about that... HAHA I thought it was pretty funny and said yea that could be a problem. I told them Clara was beautiful and they gushed about how they got to see her that night. Too Cute! We then got our picture with them and it was time to be on our way. I wish I could've just sat and talked the whole time. They were so sweet!


Seriously the cutest couple ever!!!


There's my signed copy!!!

 But we had to get back to our weekend! I had decided that since Friday we had a night out Saturday we would have a night in. So for dinner I made Salisbury Steak, something hubs was just introduced to by my mommy a couple of weeks earlier. We got out our new air mattress and started a fire in the living room for an adult camp out. We had dinner and watched Total Recall and Wrath of the Titans. 


Since we had such a long day we crashed early in front of the fire with I Love Lucy playing in the background. ( I fall asleep to Lucy)

It was the perfect weekend with my hubby!!! Hope yall had a great weekend too! And have a Happy Thanksgiving!!!

BTW you should definitely check out Sherry and John at younghouselove.com!!!

Signing off as your vitameatavegamin girl!

LoveYA 

Sunday, October 21, 2012

Disney Princess Silhouettes

Well the weekend is over and the cowboys won FINALLY!!! Sometimes it's just depressing to watch them... I didn't get to watch the whole game because I had a baby shower to go to for my friend Kary. Kary is having a girl and is naming her Aurora -- yes after Sleeping Beauty. I love this name, I used to want to name my child this but both the hubby and my mommy said no and I wasn't in the mood to argue. But being that she's named after a Disney princess her nursery took on that theme. I had seen these silhouettes on Pinterest a while back and thought they'd be the perfect starting point for a gift.


I asked Kary who her three favorite disney princesses were and she chose Aurora (obviously), Belle, and Ariel. After looking around on the internet I found some really CUTE silhouettes from Isabel Talsma. This girl has all the different Disney princesses, princes and different movie characters including Jack and Sally from Nightmare before Christmas!!! I LOVE that movie!!! BONUS!!!


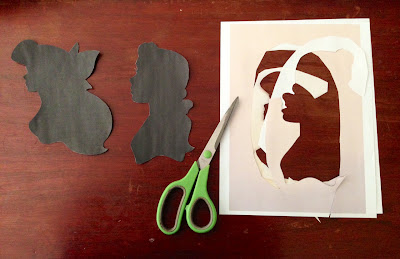
First, I cut them out


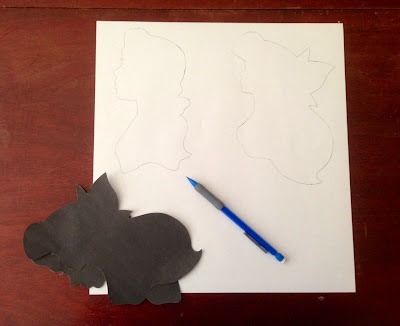
Then I traced them onto some scrapbook paper


I did some more cutting


And then I put them in some frames


Aren't they so cute and sophisticated? 

I don't know about you but I feel like certain theme rooms can get a little cheesy but I think this would be such a cute way to bring in a theme without the cheese. It makes me want to have a little disney princess room.

I must say I'm pretty proud of this project. It was easy, it turned out amazingly cute and only cost me $11. The frames were at Michaels on sale for a total of $8 and the paper made up the rest. 

***Make sure you check out Isabel's other designs by going to her Etsy shop HERE or her website HERE!!!

Thanks for stopping by!!!

LoveYa

Friday, October 5, 2012

Cookies & Cream Double Chocolate Cake Bars

Can you say YUM???

These were so good!!! Yes I know another dessert... I have a sweet tooth what can I say? The preparation was a lot like the Gooey Butter Cake I made -- easy peasy! I actually made these awhile back and never got around to blogging about it so I'm sneaking it in just in time for the weekend.


 I'm gonna keep this simple & definitely SWEET!!!

_________________________________________________________________________________

Cookies & Cream Double Chocolate Cake Bars

1 Devils Food Cake Mix
8 Tbs. (1 stick) unsalted butter, softened
1 Large egg
1 1/2 cups chocolate chips
14 oz. can sweetened condensed milk
14 Oreo cookies, broken into bite size pieces 

1. Preheat oven to 350 degrees F and line a 9x13 baking pan with     tin foil sprayed with non-stick cooking spray
2. Place cake mix, butter and egg into a large bowl, mixing to combine. Press into prepared baking pan and top with broken pieces of cookies.
3. Pour sweetened condensed milk over cookies and top with chocolate chips. Bake for 23-25 minutes, until cooked through. Remove from oven.
_________________________________________________________________

I hope y'all enjoy and have a great weekend!!!

LoveYa


Thursday, October 4, 2012

Mema's Invitation

Awhile back I did a post about a Save the Date I made for my Mema. Well naturally if there's a Save the Date there should be an invitation as well. I kinda put off making the invite because I got a little busy with school but it needed to get done. This past Tuesday I finished the invite and mailed it out.

Whatcha think?


I think it turned out pretty cute!
Hope everyone had a good week! We are having our niece and nephew over tomorrow for a slumber party and we have a birthday party on Sunday -- fun filled weekend ahead!!! Hope yours is too!!!

LoveYa

Sunday, September 30, 2012

Dr. Seuss Baby Shower

Last weekend I got to help my friend put together a baby shower. The momma-to-be chose a Dr. Seuss theme and thanks to Pinterest we had plenty of ideas.
First up was the invite.


We wanted it to have a lot of color and some of the Dr. Seuss characters. The Sneetches is my absolute favorite story so I had to put them in there!

After the invitation was sent out we got to work on the decor and again like the invite we made sure we had a lot of color!

Here are some photos from the day.


A bib chain was made to hang across the mantle. I found some Dr. Seuss alphabet cards at Target to dress up the bibs. The Dr. Seuss bags were also found at Target. I cut out over 300 circles to make the the chains that went around the entire room.


The Cat in the Hat was found on clearance at Michaels. One thing we wanted was to use books as decor and then give them to the momma to start a baby library. 


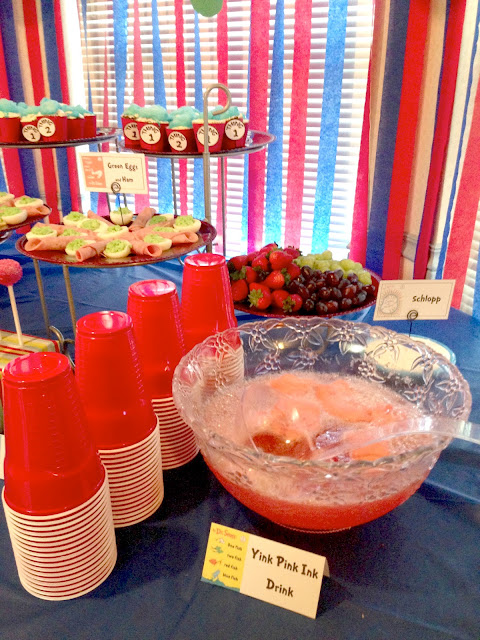
Here's the food table with some Dr. Seuss theme goodies.
Yink Pink Ink Drink
Truffala Seeds
Horton's Clovers
Poodles eating Noodles
Schlopp
Green Eggs & Ham
Cat in the Hat Kabobs
Thing 1 & Thing 2 cupcakes


Before the guests left they were to sign a note in the book Oh the Places you'll Go for the family to cherish forever.


It turned out to be a great success and was a lot of fun! Momma-to-be was very happy!!!

Hope yall enjoyed the party!!! 

LoveYa


Sunday, September 23, 2012

Gooey Butter Cake

Go Cowboys!!!
And what better way to celebrate a much needed win than to make something yummy?
I decided that since my last post was a dinner that this post should be a very yummy dessert.

Bring on the Gooey Butter Cake!

Thanks to Pinterest I'm in the kitchen again along with Zane my "Short Chef" as he calls himself. I think he had a lot of fun putting this together.
So without Further ado...


Gooey Butter Cake

1 box yellow cake mix
3 eggs
8 oz cream cheese, softened
1/2 cup (1 stick) butter, melted
4 cups (1 lb) powdered sugar

Preheat oven to 300 and spray a 9x13 dish with cooking spray. Mix cake mix, melted butter and one egg to a soft dough. Press into the bottom of the pan. Mix powdered sugar, softened cream cheese and two remaining eggs until smooth, about 1-2 minutes. Pour on top of crust. Bake at 300 for 40-50 minutes until top is golden brown. 


Can you say YUMMY? Of course since it isn't chocolate the Short Chef didn't want any when it was done. The hubby barely got him to take a bite at which he admitted it was good but still didn't want any. Strange child.... We however ate our pieces and enjoyed!

LoveYa

Wednesday, September 12, 2012

Creamy Crock Pot Chicken and Broccoli Over Rice

I decided the other night to make something new for dinner. I was pretty excited because what I decided to make would be done in the crock pot. Ok... so here's a confession...

I have never used my crock pot!

We got our crock pot as a wedding gift from a neighbor. Yea that was over four years ago... It has just sat in our kitchen looking pretty. I believe I've said before that I'm afraid of cooking. I want to cook -- in fact I would like to be a great cook but I'm afraid of messing up and making horrible stuff. So I stepped out of my comfort zone!

*Just to make clear- I am fully aware that crock pots are easy to use and that you just throw stuff in and let it sit. But being something I've never used made me nervous.

After a trip to Target I had everything I needed and started throwing stuff together. It was easy and

!!!YUMMY!!!

Doesn't it look yummy?


Everyone liked it including little man-- he has a very picky palette. Here's the recipe I found through Pinterest.

Creamy Crockpot Chicken and Broccoli Over Rice

3-4 boneless chicken breasts
1 14oz can cream of chicken soup
1 14 oz can cheddar soup
1 14 oz can chicken broth
½ teaspoon salt
¼ teaspoon Cajun seasoning 
¼ teaspoon garlic salt seasoning 
1 Cup sour cream
6 Cups broccoli florets, lightly steamed, just fork tender 
1 Cup shredded cheddar cheese
1. Place soups, chicken broth, salt, Cajun and garlic seasoning into a crockpot over low heat. Whisk until smooth. Place chicken in, pressing to the bottom. Cover lid and cook on low for 6 hours or on high for 3 hours.
2. When chicken is cooked, use 2 forks to shred into bite size pieces. Stir in sour cream and broccoli.
3. Serve over steamed rice and sprinkle with cheese.
4-6 servings

*The only thing I changed was that I put in pepper instead of cajun seasoning. The hubby isn't a fan of it and I couldn't find it at the store. I also used 5 chicken breasts and in my opinion I could've added a few more. But as I said it was still delicious!!!

In conclusion-----------> GO MAKE IT!!! Let me know what you think!!!

LoveYA


Monday, September 10, 2012

Let's go to the beach, each -- Let's go get away!

Yes summer is over but...

"Don't cry because it's over, smile because it happened."
- Dr. Seuss

We had a lot of fun this summer, we went on our first REAL vacation!!! Our son Zane had been wanting to go to the beach so we planned a trip to Galveston, Tx. We spent the first two days at the beach playing in the ocean and building sand castles.

Daddy & Chase playing
Mommy & Chase building sand castles
                 
                                                                   Zane being silly

To make sure that we never forgot our fun times I decided to make a DIY souvenir. We collected some shells and scooped up some sand from Galveston Beach. I decided I was going to put them in a jar but put it off for a while until I stopped by Michaels and found this little apothecary jar for $16.99.


 I imagined different apothecary jars featuring all our family adventures and was sold.

Here's our sand and shells in some McDonalds cups... classy I know.


Nothing complicated here of course.


   After adding the sand and shells I got on the mean machine and made this


I printed it out and put it in the jar. Ta-Da!!!!


I love it!!! I can't wait to go on more family vacations!!!

LoveYa